

Microsoft Sells DIY Surface Repair: A Step-by-Step Guide
If you own a Surface device, you know how important it is to keep it in good condition. However, accidents happen, and components can wear out over time. Fortunately, Microsoft has recently started selling replacement parts for Surface devices, making DIY repairs more accessible for technically inclined users. In this article, we’ll guide you through the process of buying replacement components, opening up your Surface device, and replacing the faulty part.
Step 1: Identify the Faulty Component
Before you can start repairing your device, you need to identify which component is causing the issue. For instance, if you’re experiencing battery problems, you may need to replace the battery or charging port. Alternatively, if the screen is cracked or damaged, you’ll need to replace the display. Consult your device’s manual or search for a repair guide online to determine which component needs to be replaced.
Step 2: Purchase Replacement Parts from Microsoft Store
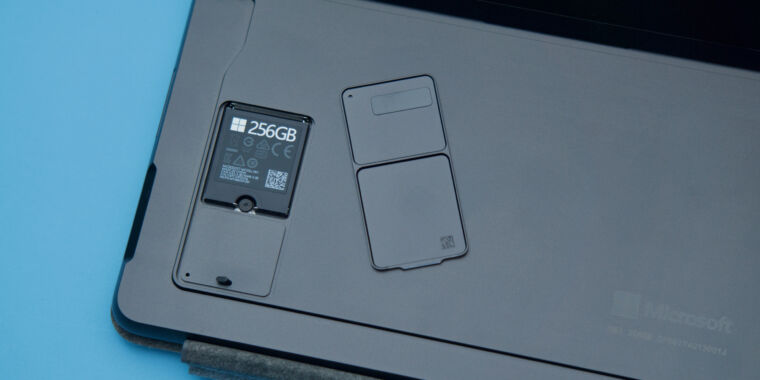
Once you’ve identified the faulty component, head to the Microsoft Store to purchase a replacement part. The parts available for purchase include batteries, displays, cameras, kickstands, back covers, and speakers, among others. Prices vary depending on the component, but can range from $15 up to $1,750.
Step 2.1: Finding the Right Part
Make sure you’re purchasing the correct component for your device. If you’re unsure which component to purchase, contact Microsoft support for assistance.
Step 2.2: Shipping and Handling
Once you’ve added the replacement part to your cart, you can select your shipping method and complete the purchase. Standard shipping usually takes 3-7 business days, while expedited shipping takes 1-2 business days. Microsoft charges shipping and handling fees, so expect to pay a little extra for the convenience of having the part delivered to your doorstep.
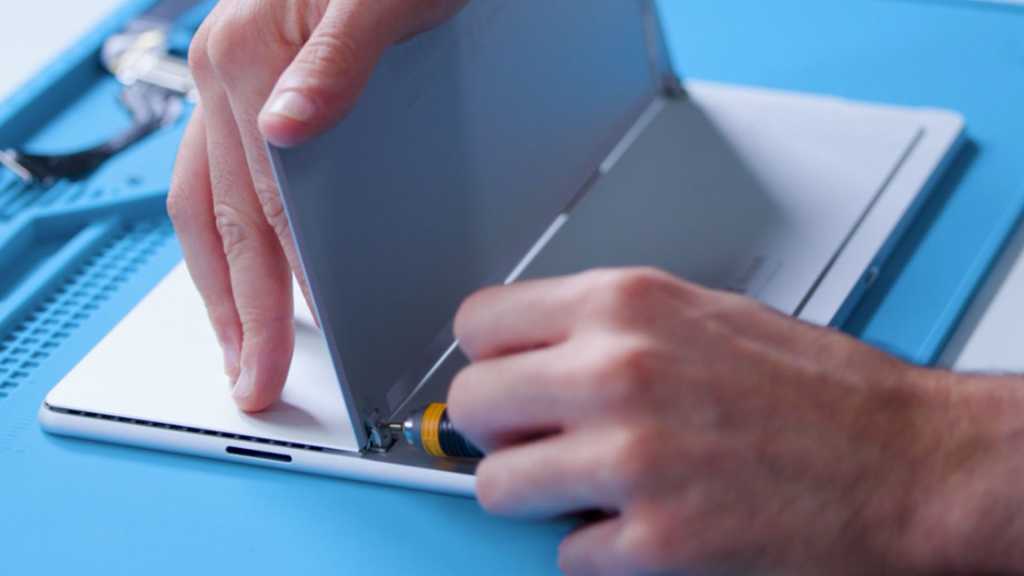
Step 3: Prepare for DIY Repair

After receiving the replacement part, you’re ready to start repairing your device. First, ensure that you have all the necessary tools and equipment for the job. Microsoft does not provide tools, so you’ll need to purchase them separately from iFixit or another reputable supplier. Also, make sure you have a clean, flat workspace and follow all safety precautions.
Step 3.1: Surface Service Guide
Before beginning the repair, consult the applicable Microsoft Service Guide or article for instructions on opening up your device and replacing the faulty component. These guides provide step-by-step instructions and diagrams to ensure that you perform the repair safely and correctly.
Step 3.2: Resources
Additionally, resources like iFixit offer detailed repair guides and videos for Surface devices, which can help you troubleshoot any issues that may arise during the repair.
Step 4: Make the Repair
Now it’s time to make the repair. Follow the instructions in the applicable Microsoft Service Guide or article to remove the faulty component and replace it with the new one. Take your time, be patient, and refer to the instructions frequently to ensure that you’re performing the repair correctly.
Step 4.1: Microsoft Support
If you encounter any issues during the repair, contact Microsoft support for assistance. They can provide additional guidance and troubleshooting steps to help you complete the repair successfully.
Step 5: Verify the Repair
After completing the repair, verify that your device is functioning correctly. Turn it on and test all the components that were previously faulty. If everything is working properly, congratulations – you’ve successfully repaired your Surface device!
Step 5.1: iFixit Resource
If you’re unsure whether the repair was successful or encounter any issues, consult the applicable Microsoft Service Guide or article or consult resources like iFixit for additional troubleshooting steps.
Conclusion

DIY repairs can be intimidating, but with the right resources and tools, anyone can perform basic repairs on their Surface device. By purchasing replacement components from the Microsoft Store and following the applicable instructions, you can save time and money while keeping your device working like new.
FAQs

1. What components are available for purchase?
Microsoft offers replacement components for Surface devices, including batteries, displays, cameras, kickstands, back covers, and speakers, among others.
2. Where can I purchase the tools needed for the repair?
Microsoft does not provide tools, so you’ll need to purchase them separately from iFixit or another reputable supplier.
3. Can I perform a DIY repair on a device that is still under warranty?
Performing a DIY repair on a device that is still under warranty may void the warranty, so it’s important to check with Microsoft support before attempting a repair.
4. What if I encounter issues during the repair?
If you encounter any issues during the repair, contact Microsoft support for assistance. They can provide additional guidance and troubleshooting steps to help you complete the repair successfully.
5. Are replacement components available in all countries?
Currently, replacement components are only available for purchase in the U.S., Canada, and France through the Microsoft Store. However, commercial resellers in all Surface markets have access to replacement components through existing channels.